Learning Leathercraft with Jim Linnell – Lesson 9: Dyeing and Finishing
Join us in this weekly video series with award-winning leatherworker Jim Linnell! In this series, Jim teaches viewers to create a wallet from scratch, including lessons on tooling, dyeing, finishing, construction, assembly, and lacing.
Find the free pattern for this project on the Leathercraft Library at bit.ly/LearnWithLinnell
Materials Used In Lesson 9:
Medium Brown Waterstain
Briar Brown Hi-Lite
The steps covered in this video are:
Inlay dyeing the background with waterstain; allow to dry overnight.
Apply a heavy coat of Super Shene resist; allow to dry
Apply a second, lighter coat of Super Shene resist; allow to dry
Apply antique finish with Hi-Lite
A few things learned from this video:
Inlay Dyeing
Whenever dyeing and staining, these processes often work best when you allow the leather completely dry out.
Inlay dyeing helps add contrast to your background and makes everything to stand out. For this step, waterstains are a very effective dye to use. Waterstains are a relatively new type of dye, however they offer a nice, rich, consistent color that stays where you put it and doesn’t rub off.
When inlay dyeing, it is important to have an ample amount of dye in the brush. Start out in the larger areas of the design and work closer to the edges as the amount of dye in your brush lightens. Don’t get in too much of a hurry and use an appropriately sized brush to be able to do the fine detail. Be very deliberate about where you put the color as dyes are permanent.
As you work in to small pointed corners where elements of the design intersect, make sure that you angle your brush so that it can reach in to the point and that it is not dragging stain where you don’t want it. Don’t hesitate to turn turn your project around as much as you need to so that you can point your brush to reach in to some of these narrow openings. It is handy to have paper towel available to be able to brush off excess dye if brushing in to these tight areas.
When you think you are done with the inlay dyeing, check your project over carefully to make sure that you haven’t missed any of the background areas as it is difficult to revisit this step after you have put the finish on.
Allow dye to dry overnight. When coloring, make sure that you allow the project to dry completely between each of the steps before moving on to the next one.
Adding A Resist
Super Shene is an effective resist finish that will help prevent the antique from getting in to the leather.
When applying Super Shene, daubers and sheep’s wool have both been traditional ways to apply finish, however a high-density sponge is preferred as it doesn’t leave any bubbling, applies the liquid evenly, and doesn’t leave behind any fibers in the finish. A good practice is to dampen the sponge and then ring out all of the moisture to help soften it so that it can conform to the design.
For the first coat of resist, use a pretty liberal amount of Super Shene. Get a good consistent coat and work it in to the leather in a circular motion. It will appear milky looking when applying, however the resist dries clear. Allow to dry completely before applying the second coat of Super Shene.
When applying the second coat of Super Shene, it does not need to be quite as heavily applied as the first coat, however make sure that it gets down in to all of the details of the project.
Super Shene protects the project and makes it water resistant, adding a nice finish to the project. Some leathercrafters may actually stop at this step, however the final antiquing process is what really highlights the details in your design!
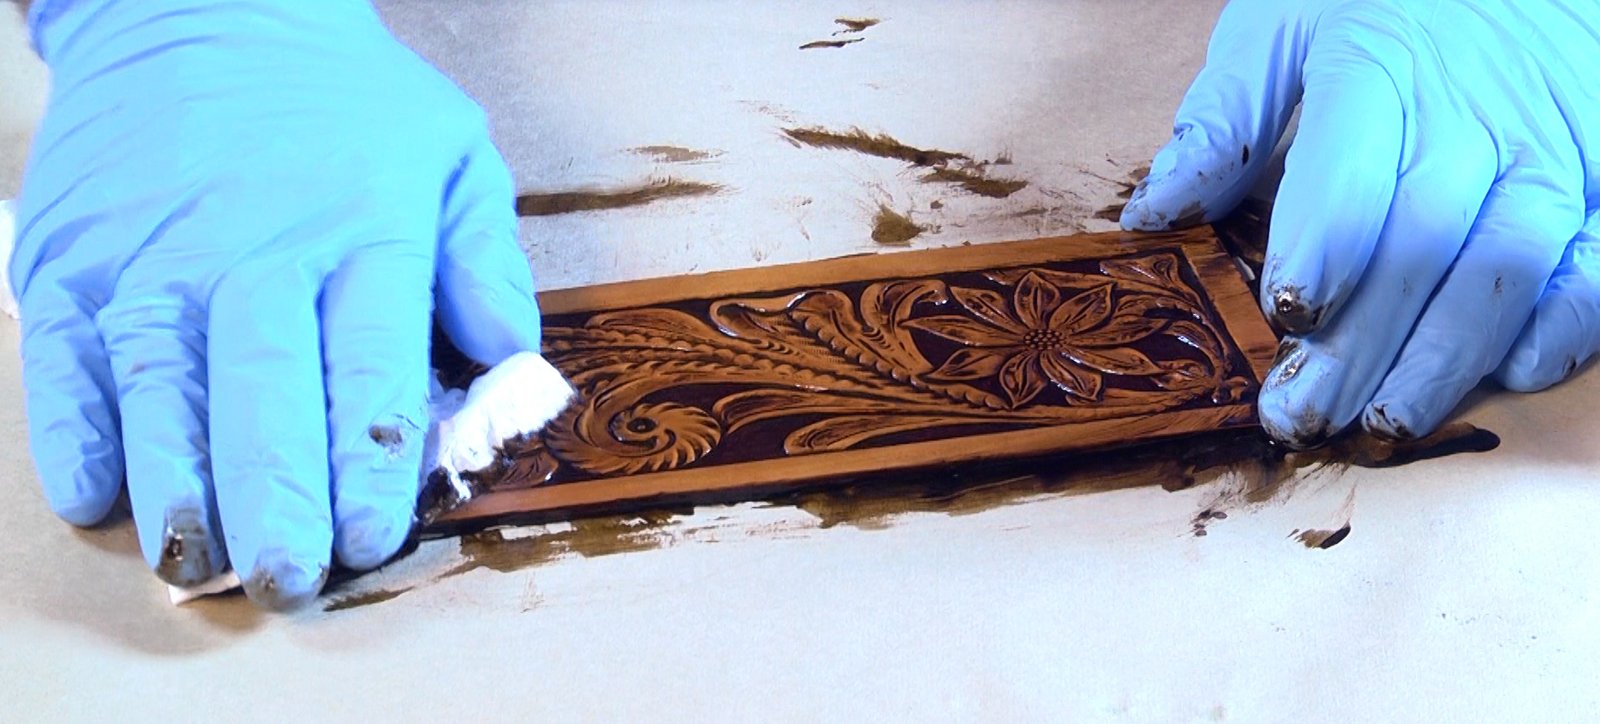
Antiquing Your Project
Antiquing liquids are designed to settle in to the cuts and impressions of the leather. If the leather were left unsealed, these products would also stain the leather; applying resist step allows the antiquing to only settle in to the designs. This allows the leather to remain its original color, while providing additional contrast and depth to the tooling details.
This project achieved the antiquing effect with an acrylic type of finish called Hi-Lite in a Briar Brown color. Apply the liquid fairly liberally with a high density sponge, completely covering the entire surface of the leather. Make sure to use enough liquid so that a good amount of the Hi-Lite is worked in to every cut and impression on your project.
As soon as the Hi-Lite has been worked in to all of the details, use a paper towel to remove the excess liquid from the surface areas. Paper towels are preferred for this step as the fibers from other applicators may remove some of the antiquing effect from the detail.
Allow the antiquing to dry a bit and come back with a dampened paper towel to gently adjust the finish to your liking.
Join us next week as we begin construction and assembly of the wallet interior!
Jim,
I am enjoying your “lessons”. I have a question. You said you let the background stain dry over night. What about the super sheen? How long do you let it dry before applying the antique?
Thanks,
Niki
Great question! Make sure that it feels dry to the touch between coats of Super Shene and then it is ideal to let it dry overnight before applying the antique finish.
Jim your lessons are spot on, they confirm what I know and educates on what I didn’t know, Thank You!
Stains tend to dry out the leather. Can oil be applied at some point to get the flexibility back?
If so, when?
Drying out of the leather is more of a problem with solvent based dyes rather than with water based products or acrylics. When using solvent based dyes, the alcohol that evaporates when drying tends to take some of the moisture with it and you may need to re-oil the leather down the road. Using the waterstains, you shouldn’t encounter this issue.
Hello, Jim,
I have enjoyed seeing your video and I have a question. I had always heard that the leather should be treated with oil before dyeing and sealing. Why didn’t you do that? Thanks, Gary Scheffert
Pre-oiling leather is a traditional technique used by makers of saddle and tack whose leatherwork is intended for outdoor use, however it is not necessary to oil the leather for the majority of personal projects. Oil also tends to darken the leather, which was not the look I was trying to accomplish with this project. Hope this helps!
Jim,
Do yu put a coat of super sheen on after the hi-lite? Being water based won’t any moisture remove the hi-lite in the impressions? Also, how to you put a final super sheen coat on without messing up the hi-lite in the impressios? Thanks.
The Hi-Lite is an acrylic, so you can leave it unsealed. Adding another coat of Super Shene would give it a high gloss, however you may also remove some of the antiquing when applying.
air brush the super shene
So, if I do not seal the hi-lite, if I touch the finish with wet hands will the hi-lite come off on my fingers? If that is the case Will sealing it with resolene or super sheen prevent this? Thanks for the great instruction!
After the Hi-Lite has had a chance to fully cure over a few days, it should be resistant to moisture. If you are concerned with the potential of getting your project damp regularly, you may consider sealing it with a coat of Super Shene, however note that this may lighten the antiquing.