Learning Leathercraft with Jim Linnell - Lesson 1: Preparing Your Leather
Near the beginning of July, we asked our social media followers what kind of advice the would request from award-winning leatherworker Jim Linnell. With over 100 responses, Jim selected some specific questions to answer while offering some of his best technique advice to get the best results from your leatherwork! Join us in this weekly series on carving a wallet back with tips and tricks from Jim Linnell!
Find the free pattern for this project on the Leathercraft Library at bit.ly/LearnWithLinnell
Materials Used In Lesson 1:
Printed Pattern
Pencil
Scotch Tape
4-5 oz Vegetable Tanned Leather
A few things learned from this video:
Tracing your pattern on to tracing film is one of the first places that you will want to be patient and pay attention to detail. Having a nice, cleanly traced design helps your finished project to be as accurate as possible.
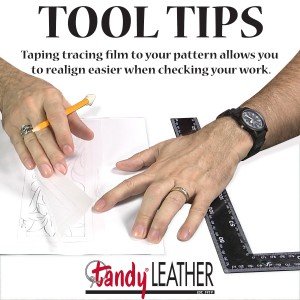
Taping down your tracing film to the pattern will help you realign the two when checking to make sure that all of the lights have been traced. Using a ruler on straight lines will help you keep your pattern centered when transferring it to the leather.

Gluing your leather to a piece of cardboard or matboard helps prevent the leather from stretching as you tool it, as well as allowing more depth in tooling with thinner leathers. It is important to use rubber cement rather than contact cement or other adhesives as rubber cement offers a temporary bond that allows for the backing to be removed when you are done tooling.

Moisture content is important to get clean impressions and the right burnish in your tooling. Start by saturating the leather fairly thoroughly in your initial wetting, penetrating at least half of the way through the leather, and then allow the leather to begin to return to its natural color before tooling.
Taping the back of your project to your work surface before tracing ensures that the leather does not move during the tracing step.
Using a stylus is the ideal way to trace patterns in to your leather. Press lightly and retrace the pattern on to your leather to create a shallow imprint that can later be used for carving. Be deliberate and careful, making sure to follow the lines as closely as possible for a clean pattern on your leather to begin with.
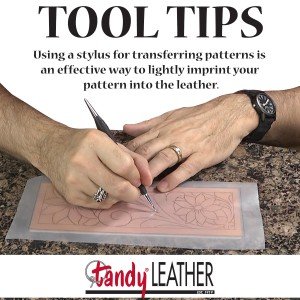
Using a pen, pencil, or other utensil to trace the pattern may puncture the tracing film and leave a permanent mark on your leather. Using the right tools is important.
When tracing the flower centers, use a dotted line rather than a solid line. This will allow for cleaner seeding in later steps.
Wing dividers work great to trace straight, consistent lines for the borders of your project.

Join us next week as we move on to the next step of the project, swivel knife cutting!
Excellent! I’ve been carving for years, but I still picked up a trick or two here.
I enjoyed this lesson it was well presented.
I know by watching these lessons I will learn a lot on leather crafting
For a neophyte, at least, very good information. Very helpful. Looking forward to the next lessons!
Good presentation. When I started 50 years ago I learnt the hard way. Looking forward to the rest of the series.
very nice work, I believe Jim Linnell is one of the finest leather workers I have ever seen
I live in Queensland and wondered if Jim would ever be coming to Brisbane to teach. Love to join in if he is.
Kev, AKA ‘Woodpecker’